By Michael Brown for PC World
I’ve amassed more than 30,000 digital photos over the years. I shot most of them; others I scanned from prints gleaned from photo albums and family archives. I’d wager that 95 percent of them are junk—poorly composed, badly lit, over-or underexposed, people with their eyes closed, you name it.
None of them, however, are so terrible that I’d want to obliterate them. As a family historian, I recognize that even the most casual snapshot has some intrinsic value; but who has the time to sort through that many pictures to find the 10 or 20 in a given category that is worth showing off? And what’s the best way to ensure that these best-of-the-best photos not only appear on all my mobile devices, but in places and on services that allow interested friends and family to see them, too?
The secret, not surprisingly, is to let a computer do the heavy lifting. I auditioned three of the latest consumer-oriented photo-editing/organizing tools on the market: ACDSee Pro 6, Adobe Photoshop Elements 11, and Cyberlink PhotoDirector 4 to determine which product was the most capable of helping me separate the wheat from the chaff—and then sharing the wheat.
I didn’t spend a lot of time evaluating the editing tools in these packages, since my primary objective was to find the photos that were worth editing in the first place. I will produce a complete three-way comparison down the road; but for this project, Adobe’s Photoshop Elements 11 quickly rose above the other two to become my favorite organizational tool.
SmugMug is my service of choice when it comes to sharing my photos online, and Photoshop Elements 11 can export my photos directly to SmugMug. The program can send photostreams to free services such as Facebook, Flickr, and several other online services just as easily. (The photos used to promote this story, incidentally, are used with the permission of two photographers who also use SmugMug. “Purple Plunge: Spotted Cucumber Beetle on Thistle” was shot by L. Perry Fuqua. And Ed Murray produced “Bridge Over Placid Water.”)
First Steps
The first step to bringing order to chaos is to consolidate all your digital photos into one place. This could be a shared folder on a home server or NAS box, a USB hard drive, or a folder on whatever computer you’re using to organize your library. You needn’t worry about creating complex, nested directories or figuring out what’s in all your existing folders; Photoshop Elements will take care of that in short order. Consolidation will make this job a little easier for both you and Photoshop Elements.
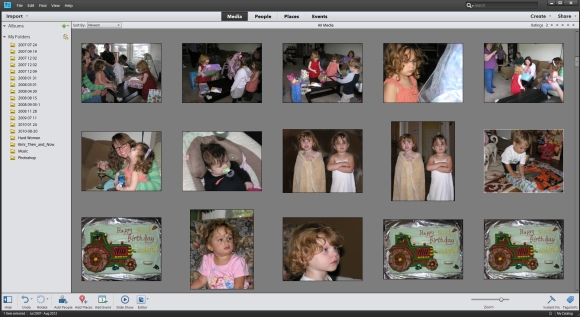
The Media Gallery in Photoshop Elements is your jump-off point to getting your photo collection under control.
Once you’ve installed Photoshop Elements (you can download a trial version if you’re not ready to spend $100 to purchase or $80 to upgrade), launch the program and click on Organizer. A dialog box will appear asking where you’d like to import the photos. Choose the option to import from files and folders and click the Next button. Navigate to the folder where you moved your photo collection. If you moved all the folders into one master folder, you can simply click on that folder and then click the Media Files button.
Especially if you know there are some folders you don’t want to import, you can dig deeper into the directory and choose individual folders. Select multiple folders by holding down the<Ctrl> key and clicking the folders you want to work with. Once you’ve selected all the folders you want, click the Get Media button.
Photoshop Elements will produce a dialog telling you how many photos it imported, and it will also let you know of any files that were not imported (typically because the files were in a format that the program doesn’t support). Note that Photoshop Elements doesn’t physically move these files—they’ll remain in their original locations. Photoshop Elements behaves like a database program and simply links to the file locations. The program will display in a grid all the photos you’ve just imported. It will also present the same dialog box asking if you’d like to import more photos. Let’s skip that step for now by clicking Cancel.
Who are you?
If your photo collection is anything like mine, most of your photos will be of people. When you have 30,000 photos, it’s virtually impossible to manually find and tag every photo of every important person in your life. Fortunately, Photoshop Elements has a strong facial-recognition algorithm that can automate this process for you. Click on the People button at the top of the grid view. Photoshop Elements will open a window containing photos of a number of people in the photographs in your collection, each with a caption that reads “Who is this?” Click on photo and enter the person’s name in the box below.
First names are usually enough, unless you know there will be more than person with the same first name. You can double-click on a picture if you’re unsure who someone is. This will present the entire photo, which often provides enough context to jar your memory. Double-click a second time to return to face view where you can type in the person’s name. Alternatively, you can link Photoshop Elements to your Facebook account. When you do this, Photoshop Elements will download your Facebook friends list so that you pick from lists of Facebook contacts. When you’ve finished assigning a name to each photo (note that you don’t necessarily need to assign a name to every face in your collection; if there are strangers or other people whom you don’t wish to keep track of, right-click and select “exclude.”
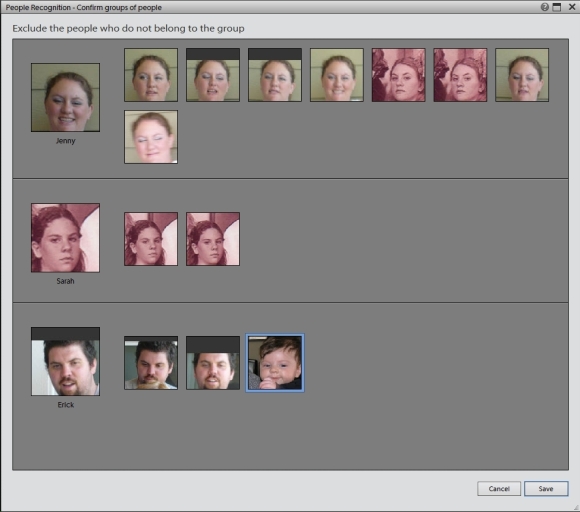
Once you’ve identified a few people in your photos, Photoshop Elements 11 will begin analyzing the rest of your catalog for matches.
Once you’ve identified your first batch of faces, Photoshop Elements will comb the rest of your collection searching for similar faces. According to Adobe, the software identifies faces by the distance between the eyes in relation to your nose. Apparently, this distance never changes, so the software is able to identify a person no matter what age they were when the photo was taken. The software does a remarkable job, but since the vast majority of my photos are snapshots of my grandchildren, I found that it frequently mis-identified one cousin for another.
In the next step, Photoshop Elements will present photos of peoples’ faces to the left of grids of faces it thinks are the same person. Your task here is to reject any inaccurate matches. If you need to enlarge a photo to accomplish this task, I heartily suggest you do it before you begin rejecting any photos; otherwise, your selections will be undone. You’ll repeat these steps frequently while Photoshop Elements improves its accuracy. You can cancel this process at any time to return to the main People window. You’ll see stacks of thumbnail images of the people in your collection. You can scrub through these stacks to see all the images in them by hovering your mouse over a stack and moving it back and forth. Once you’ve finished this step, all your photographs of people will be tagged with their names—even in group shots—and you’ll be able to search for every photo of any given person whenever you want.
Where are you?
You can also tag each photo with other information, including where the shot was taken. The Places tag allows you to indicate where a particular photo or group of photos was taken. Click on the Places button at the top of the screen, and a map of the U.S. will appear. Choose the photos you’d like to place at a specific location (to choose multiple photos, hold down the <Ctrl> key while you click) and then either click on a map coordinate or type the information into the search box.
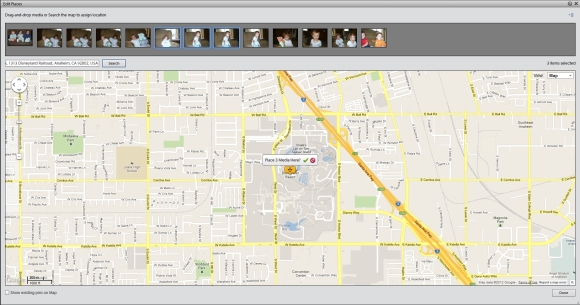
Use the geo-tagging feature to associate places with your photos.
Your search criteria can be as specific as an address, as general as a city, or it can be a well-known destination, such as Disneyland. Click the Search button, and the map will zoom to that location. A dialog will appear asking if you’d like to place the media there. Click the green checkmark to do so, the international “no” sign, if you’ve changed your mind, or draft the location button around the map using the button beneath. Click the Done button when you’ve finished placing images.
Note that if the device you used to capture a photo is equipped with a GPS, the precise location where that photo was taken will be embedded as a tag in the photo. Photoshop Elements can read these tags and pin the photo to a world map. The more elements you define, the more granular your searches can be, but you don’t need to do this all at once. You can come back to this step—or bounce between this and the other two tagging steps—as often as you’d like. Each photo can be tagged more than once, too; none of the tags are mutually exclusive.
What’s happening?
The third way to organize your photo collection in Photoshop Elements is to define events—birthdays, anniversaries, holidays, and such—and then tag your photos with that information. To do this, click on Events in the top nav bar and then click Add Event at the bottom of the screen. All of your media will be loaded into a browser, from where you can create events (including a name, a data range, and a description). Repeat this step until you’ve created all the events you wish to define, and then click Done.
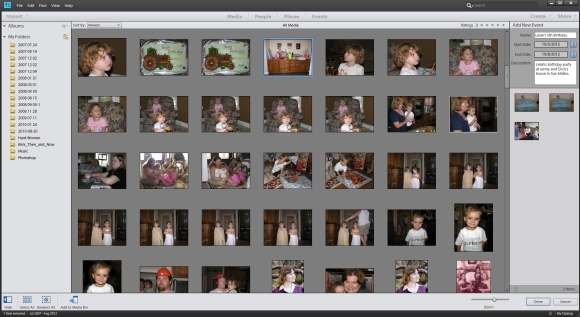
You can also associate photos with events, such as birthdays, using the Event tag.
Label your favorites
Organizing your photo library is only half of what Photoshop Elements is capable of. You can also edit your photos to correct problems or to polish gems, and you can launch this half of the software right from within the organizer. That’s beyond the scope of this story; here, culling your collection to focus on your best or favorite photos is what we want to do. And it’s very easy to do in Photoshop Elements.
You can work with all your photos at once by clicking on the Media tab, but since most of my best photos are of people, I find that it’s easier to work with the People tab.
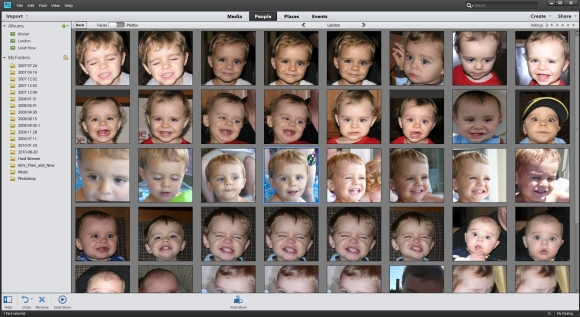
Faces mode makes it easy to find people, but since it isolates faces, the photos might not be as great as they look here.
Double-click on the photo stack you want to work with to load all of those images into the gallery. You should be aware, however, that the gallery toggles between Faces mode (which displays only faces), and Photos mode (which displays the entire image). You’ll find the toggle switch above and to the left of the photo grid. If you’re picking your favorite photos and don’t intend to crop them, you should use Photos mode.
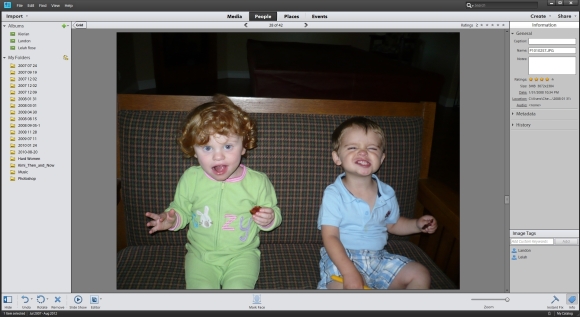
Assigning star ratings to your favorite photos makes them easier to find later.
Double-click on the thumbnails of each photo you think you’d like to showcase and share, so you can get a good look at them. Now move your mouse over to the Information column at the far right. Click on General to expose the information there, including the star rating. Assign the photo between one and five stars up to the right-hand corner of the screen, and assign the photo a star rating. Repeat this process for as many photos as you’d like.
Share your photos
Once you’ve identified a few photos you feel are worthy of other people’s attention, sharing them is extremely simple. To separate your favorite photos from the rest, click the Gridbutton in the upper left to display all your photos. Move your mouse up near the right-hand corner and fill in the number of stars that indicate share-worthiness (I’d pick four and five, unless you’re a very harsh judge). Now the only photos you’ll see in the grid are those with at least four stars.
As I mentioned early, SmugMug is my personal favorite as a photo-sharing service, but not everyone in my family is interested in using a subscription service, so I also post many photos to my Facebook page. To do that, pick the photos you’d like to share from this collection (to select multiple photos, either hold down your mouse button and drag, or hold down the <Ctrl> button and click the ones you want with your mouse). Selected images will have a blue frame around them.
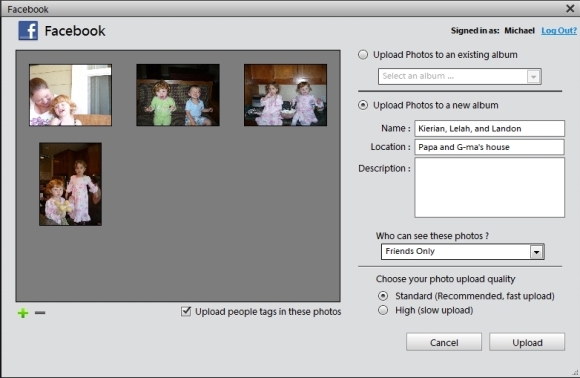
You can upload single photos or entire batches directly to a variety of online services, including Facebook.
If you’re interested in sharing entire batches of photos, you’ll find that it’s faster if you first create a photo album. If you want to create an album about a particular person, select thePeople tab before creating the album. Now move your mouse to Albums (in the upper left corner) and click the plus sign to create a new album. Choose New from the drop-down menu, and a dialog box will open on the right-hand side asking you to provide a name for your new album. Give the album a name, and then drag the photos you want to reside in that album. If you’ve already created stacks of photos, you can drag these entire stacks into the album; otherwise, you can drag them into the album one at a time.
When you’re ready to share these photos, simply click on the Share drop-down menu at the top far right side of the screen and choose the service to which you’d like to post the images (Facebook, in this example). Photoshop Elements 11 will open a dialog box offering you the choice of uploading the photos to an existing Facebook album or uploading them to a new album. You can also indicate here whether the photos will be visible to everyone on Facebook, only to friends of friends on Facebook, or only to your Facebook friends. Photoshop Elements 11 will also offer you the choice of uploading standard- or high-definition images (the latter are large files, so they take longer to upload). Any name tags assigned to the photos will also carry over.
Other sharing alternatives include sharing photos on Flickr and emailing photos to individuals or using other photo-sharing sites, such as Flickr. If you’re an iOS user, Adobe’s Revel subscription service ($6 per month) lets you send photos to your iPhone, iPad, or Mac (Windows and Android versions are in the works).
I obviously have just scratched the surface of photo-organizing and photo-sharing products on today’s market. Hit the comments section below and share your favorite service, tips, and trick


