Like any process, it’s important to have a good base to your workflow. Photographers need to understand just how important post-processing is to the whole business of photography.
You should picture your workflow as a tree.
The roots have to be strong for the tree to grow. Without a solid and efficient process of importing, backing up, keywording, and copyrighting your images the rest of your workflow will suffer. Being efficient means you increase your productivity and your profitability.
For portrait and event photographers this means you spend more time finding prospective clients and shooting sessions. As much as I have advocated for post-processing we still make money taking photos not sitting behind a computer. Our post-processing methods need to enhance our business not slow it down. Follow these steps to enhance the first phase of your post production workflow.
 This hierarchy divides images by the type of portrait and then further into company names or family names. It’s important to consider a system of labeling that will make it easy to find your work. I know of photographers who organize everything by date and then cross reference their information on a spreadsheet. It works for them… Just try to find a method that is efficient and doesn’t leave you spending hours searching for specific photos.
Quick Tip:
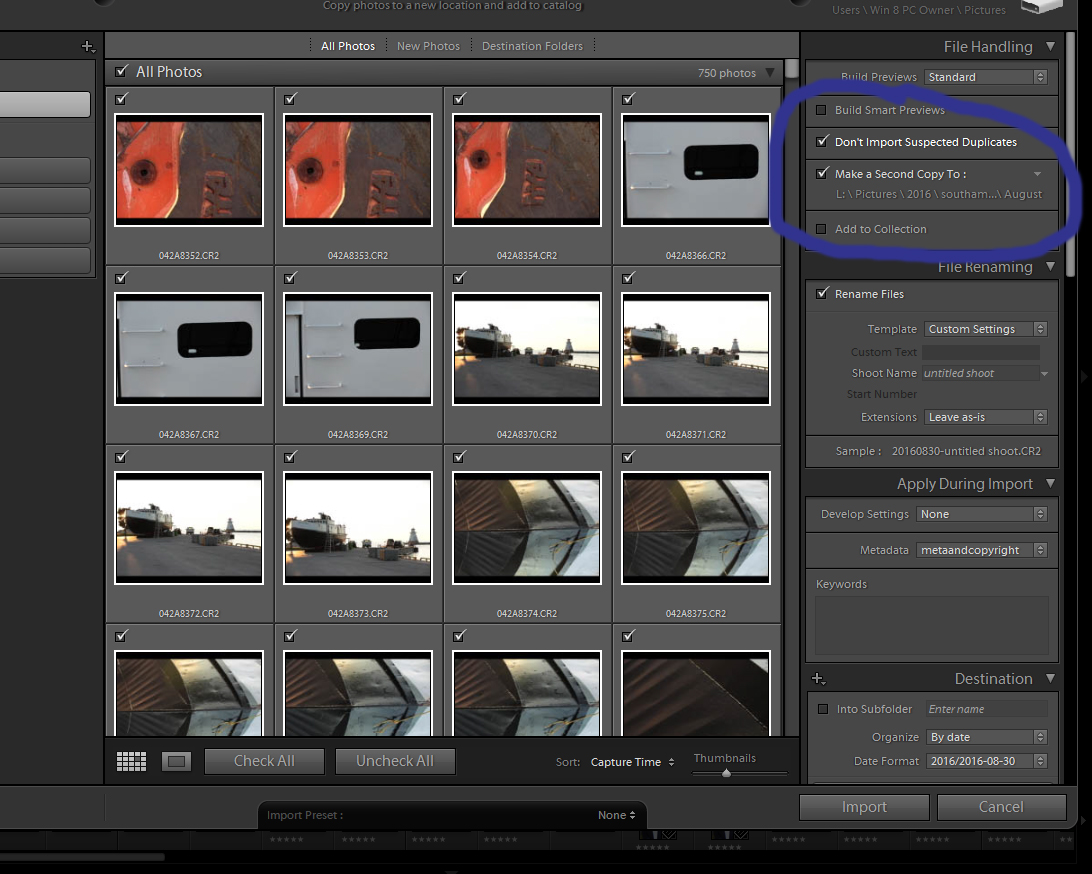
In Lightroom, you have the option to save your files to a second location. Choose to upload images onto your hard and also to an external drive in one simple step. Lightroom was designed for photographers and truly helps to streamline your workflow. This option is located in the file handling section of the import dialog. Bridge is very similar to Lightroom images are imported into the program through the term “Get Photos from Camera” and you can arrange folders in the same way.
This hierarchy divides images by the type of portrait and then further into company names or family names. It’s important to consider a system of labeling that will make it easy to find your work. I know of photographers who organize everything by date and then cross reference their information on a spreadsheet. It works for them… Just try to find a method that is efficient and doesn’t leave you spending hours searching for specific photos.
Quick Tip:
In Lightroom, you have the option to save your files to a second location. Choose to upload images onto your hard and also to an external drive in one simple step. Lightroom was designed for photographers and truly helps to streamline your workflow. This option is located in the file handling section of the import dialog. Bridge is very similar to Lightroom images are imported into the program through the term “Get Photos from Camera” and you can arrange folders in the same way.


 The photography market is tough! Be sure to use every tool available to grow your business. I know it is frustrating to have to spend so much time in front of the computer but unfortunately, this is the trend in professional photography. I say embrace the trend it is not going to go away. Learn how to create an efficient workflow and make this part of the industry work to your advantage. Of course, if you’re too busy to take care of all the finicky details you can check out our services and find out how easy it is to have us take care of your workflow!
Step#1: Secure Your Assets
Our images are our main business assets; they are our bread and butter. Securing our image library is the first stage of professional practice. It is not acceptable to lose images when shooting professionally. Imagine the look on a couple’s face when you tell them your computer crashed and all their precious wedding memories are gone…..Use the 3-2-1 Method to Secure Your Photos
Most photographers use the 3-2-1 method of securing their work. This means three separate copies of your photographs. Save your work on two different types of media and save one copy in the cloud. Cloud backup options include companies like Dropbox. It’s not overly expensive and can save your business if something goes wrong. Do some research and find a system that works best for you. The more copies of you work that you have stored in different locations the more secure your business. Note: We recommend checking the rights and usage terms for any free services you may choose to use. It’s best to use a paid system free cloud back-ups have their issues most compress photos.Step#2: Organize Your Photos
a) Create a Hierarchy of Subfolders
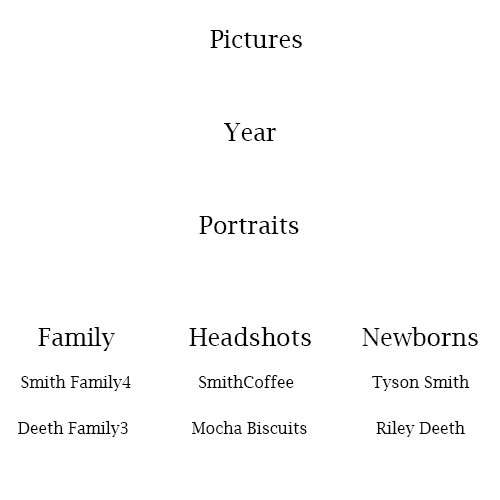
After deciding on a method of back-up it’s time to organize those files and import your photos. There are many programs that can help you import and organize your work. Three of the most popular programs are Lightroom, Bridge, and Photo Mechanic. For this article, we will discuss methods of organizing using Lightroom and Bridge. I know photographers who rave about Photo Mechanic but I will admit my bias here for using Lightroom. I love the program. The first step is to decide on a root folder for your images. I use the root folder “Pictures” as my home base. This file is located on my computer hard drive. Photographs are then organized into subfolders that define their characteristics.The key is to organize your photos into manageable subfolders that will make it easy for you to retrieve files.Consider this graphic below and how images might be stored in each folder.
This hierarchy divides images by the type of portrait and then further into company names or family names. It’s important to consider a system of labeling that will make it easy to find your work. I know of photographers who organize everything by date and then cross reference their information on a spreadsheet. It works for them… Just try to find a method that is efficient and doesn’t leave you spending hours searching for specific photos.
Quick Tip:
In Lightroom, you have the option to save your files to a second location. Choose to upload images onto your hard and also to an external drive in one simple step. Lightroom was designed for photographers and truly helps to streamline your workflow. This option is located in the file handling section of the import dialog. Bridge is very similar to Lightroom images are imported into the program through the term “Get Photos from Camera” and you can arrange folders in the same way.
b) Keywording Your Images (the Ultimate Organizational Tool)
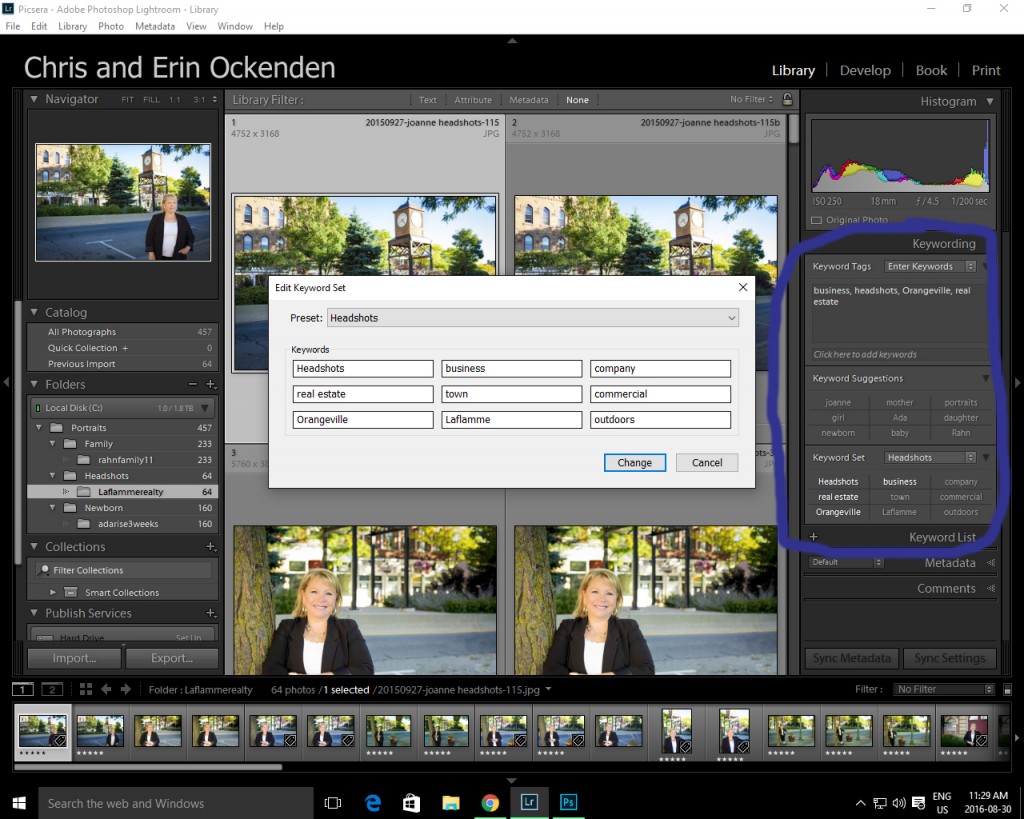
Hitting the “Import” button and directing files into a folder isn’t the only step you should take during this first phase of your workflow. Keywording, another important task is much easier to complete during the downloading and backup stage. Quite simply, keywording your images will save you time. I recently had a magazine call me looking for images of an autumn meadow. Using keywords I was able to quickly search through all of my files and identify images that might be suitable. I used the text search to image with the keywords Autumn, Nature, and Landscape. Using these terms I found 7 photographs in 5 less than minutes. The magazine purchased three of photos for their article. Generally, as a rule of thumb, you should add at least three keywords to each image. Consider the qualities of the image and use these to help you design keywords. Lightroom makes keywording intuitive. As you start to add keywords to your catalog, the program will produce suggestions for you. These suggestions are located below the keyword box. Try typing in a few words and as you build your Lightroom catalog you will see the suggestions options grow. <Want to avoid the hassle of keywording your images? Let us do the work for you! Click here to learn more>Keyword Sets
Keyword sets are a useful tool located within the library module. You can create sets of keywords that fit with a specific type of photograph. In a keyword set designed for a family session, you might include terms like mother, father, brother, sister, indoor, outdoor, etc. Try to look at the qualities of your images and to create ways of classifying the photos using these common attributes. In Bridge, you can also create sets but the design is a little different.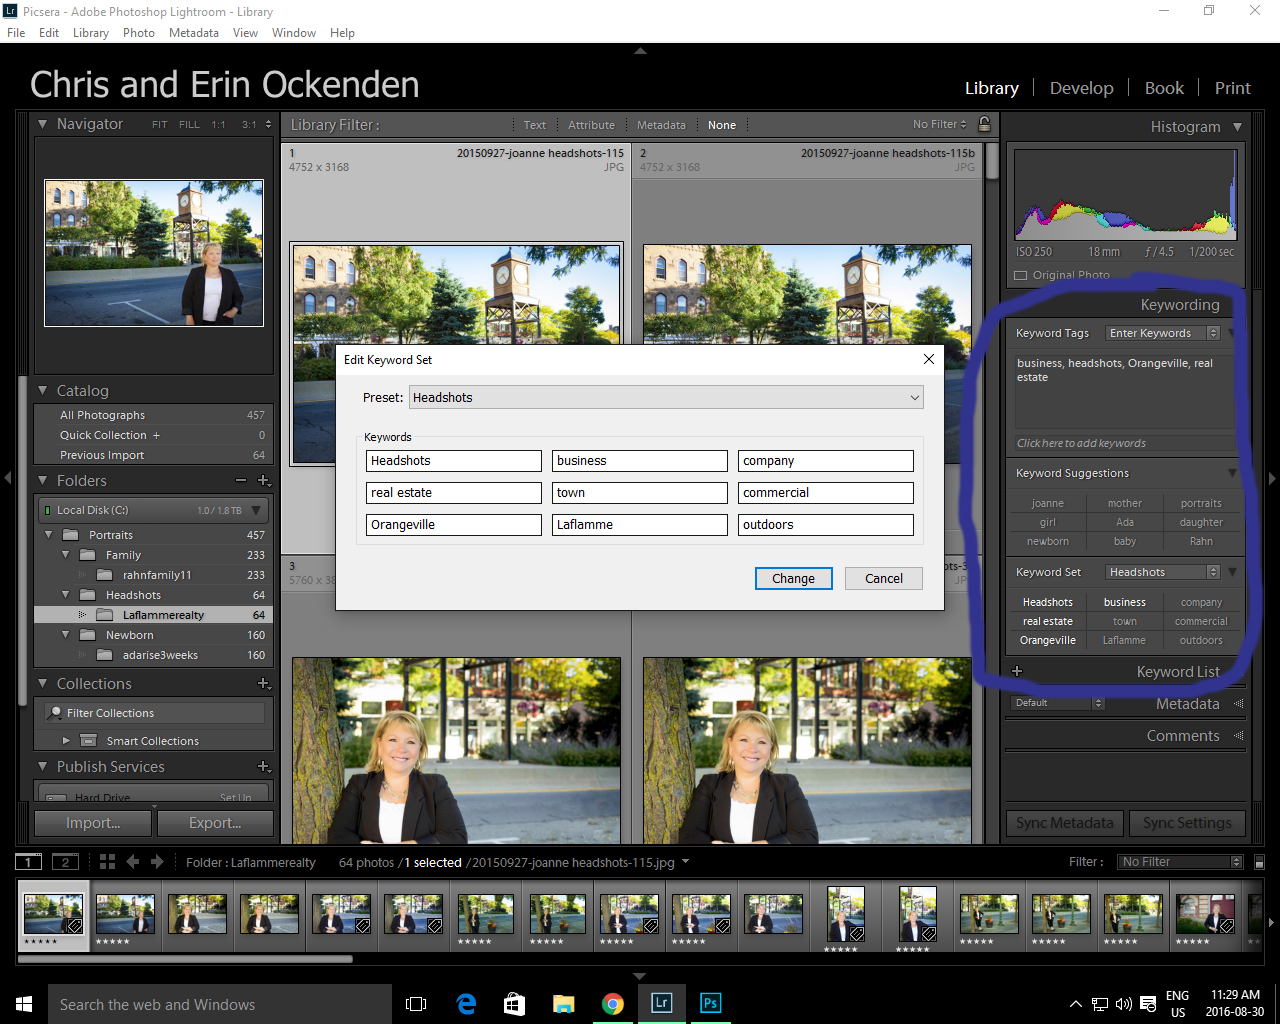
Keywording Shortcut
The designers of Lightroom have also added a neat little feature to the keywording section. Hold down the ALT button on PC or the OPTION key on a Mac when in the keyword section of Lightroom. You will see numbers appear beside each keyword in the sets section. If you continue holding down the ALT key then press the number which appears beside a keyword. Your tag will automatically be added to your keywords for that your selected imaged. It’s very simple but it makes keywording a very quick and easy step in your workflow.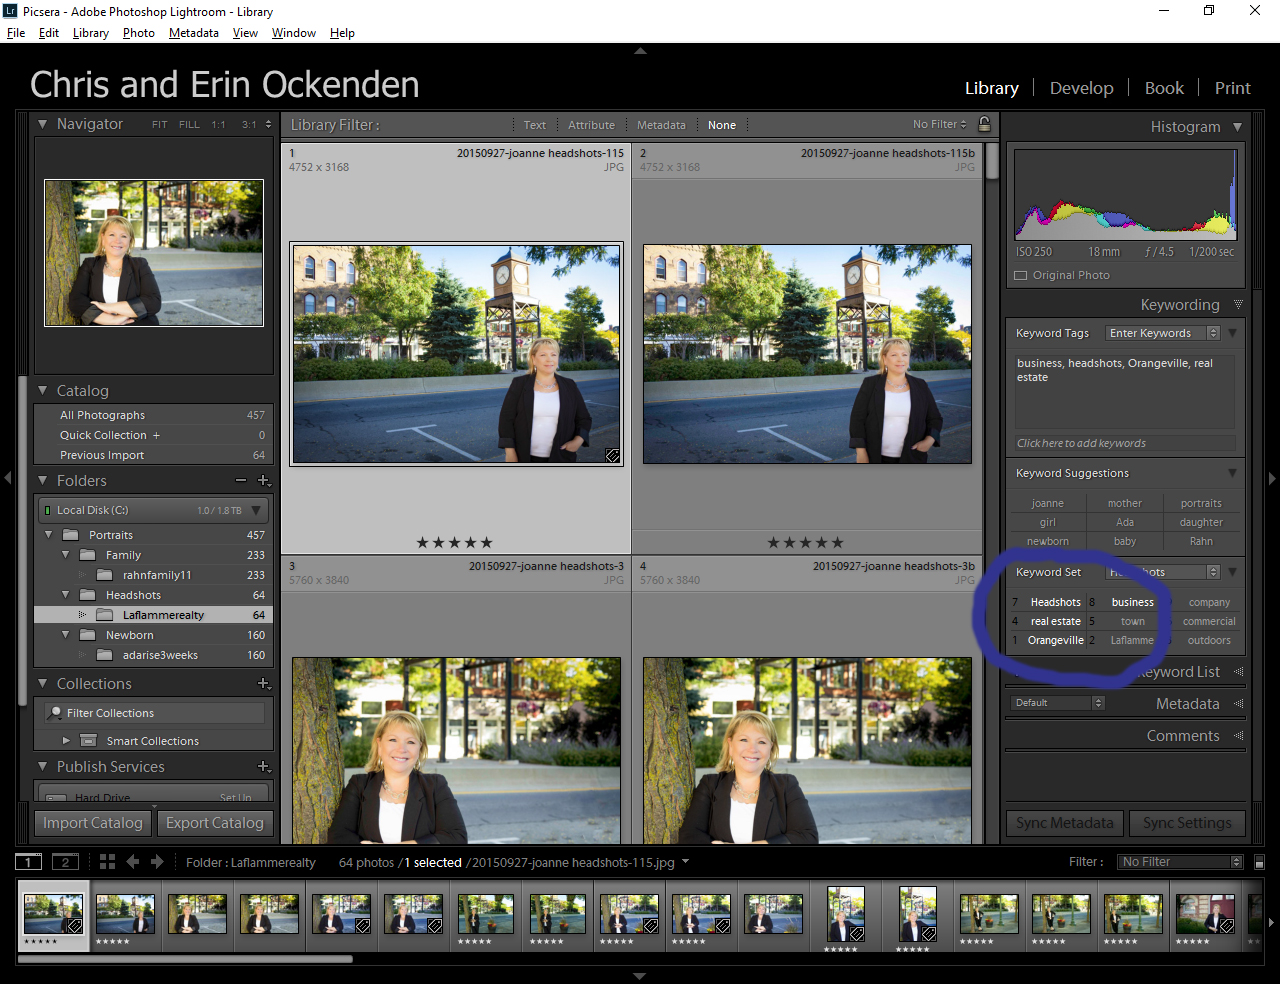
Step#3: Protect Your Photos with Metadata and Copyright- You Won’t Regret It!
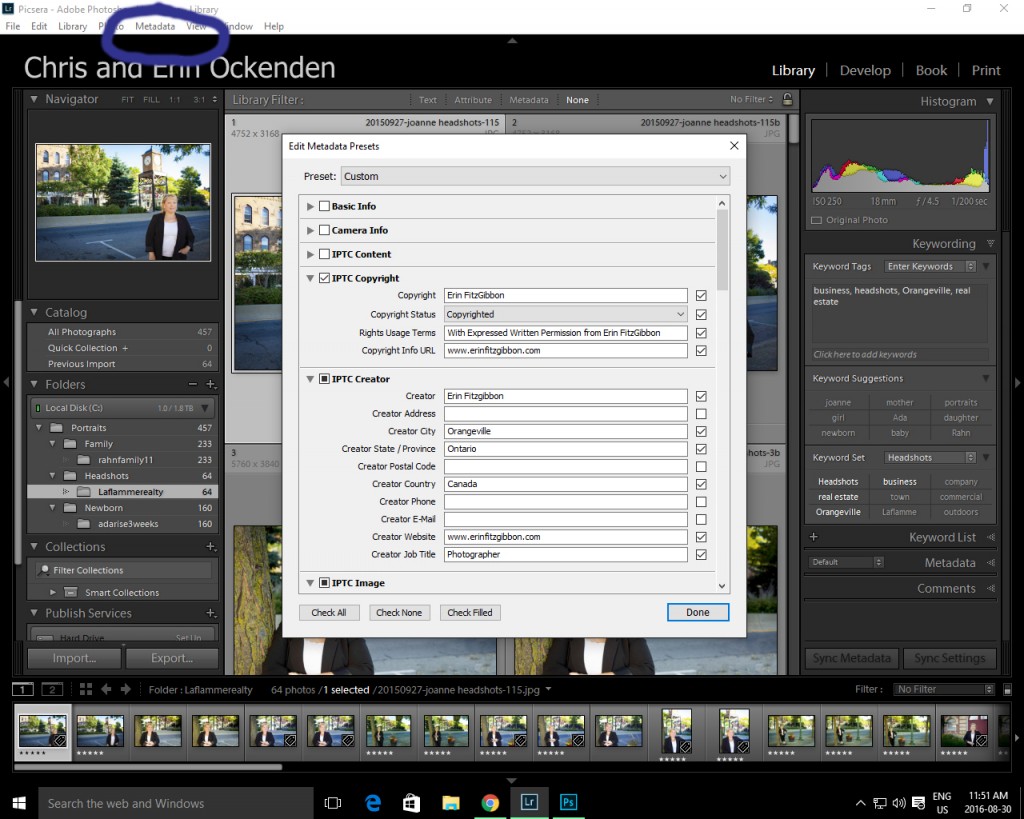
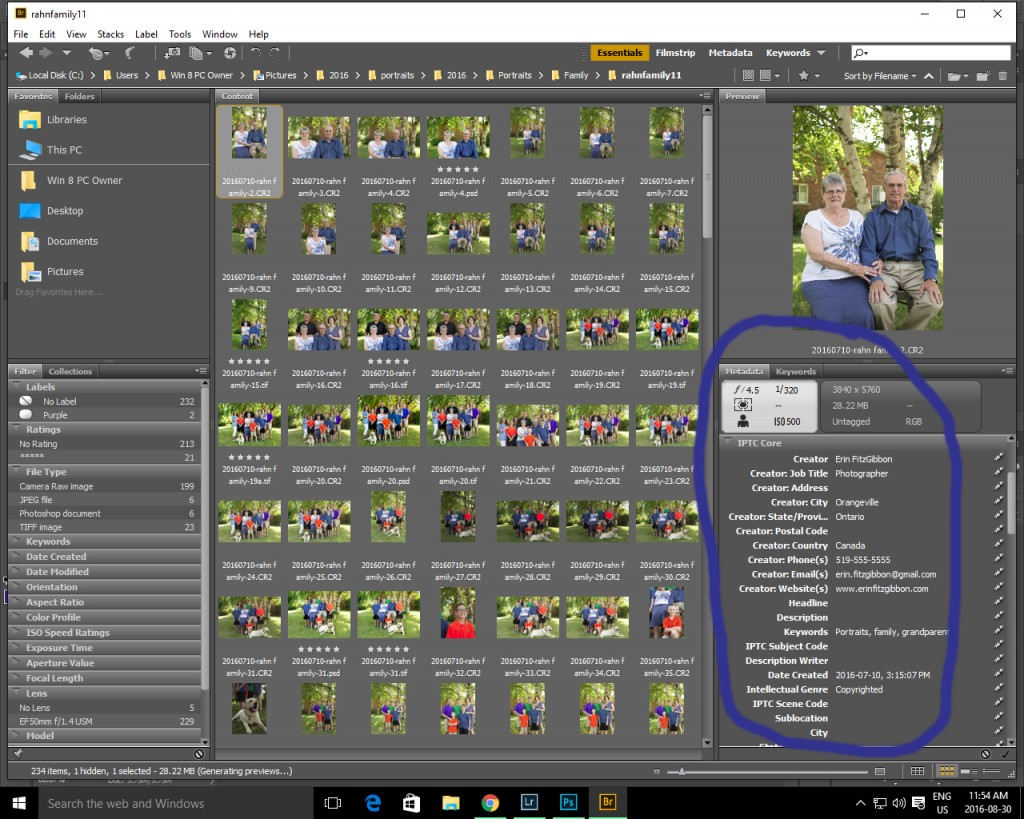
Copyright and Metadata are a very important step to protect your files. Image theft is never fun in fact it’s downright frustrating. Including copyright and detailed metadata helps protect your creative property. It also adds an element of professionalism to your work. It shows you are business savvy and you understand today’s photography market. Lightroom once again has tried to create an intuitive system for adding metadata to your files. Within the Library module, you can create metadata presets which you can then apply upon import. Select the metadata field from the top of your library menu and select edit metadata. A dialogue box will appear in which you can enter your information. The two fields you should be most concerned with are the IPTC Copyright and IPTC Creator. Filling out the information in these two fields helps to protect your work. If you sell digital images, having metadata that restricts usage can prevent clients from going beyond the agreed upon printing privileges. I did not include proper metadata once and clients pulled my image from a proof gallery to use on their thank-you cards (the image included my watermark). Having the proper metadata would have given me more legal strength in collecting compensation for usage. It was a tough lesson to learn but also one I will never forget. When creating your presets consider the different rights and usage terms available to photographers. It’s important to include the correct terminology in your Metadata for example, “with expressed written consent from….” or “for consideration only, no reproduction without prior permission.” Please be sure to do a little research or consult a lawyer to ensure you have the correct terminology.
 The photography market is tough! Be sure to use every tool available to grow your business. I know it is frustrating to have to spend so much time in front of the computer but unfortunately, this is the trend in professional photography. I say embrace the trend it is not going to go away. Learn how to create an efficient workflow and make this part of the industry work to your advantage. Of course, if you’re too busy to take care of all the finicky details you can check out our services and find out how easy it is to have us take care of your workflow!