Skip to content
Home / News / 7 Key Tips to Create Amazing Clothing Photography for Ecommerce and Product Catalogs

7 Key Tips to Create Amazing Clothing Photography for Ecommerce and Product Catalogs

A picture speaks a thousand words is a well-known saying.

Clothing Photography

And it’s no secret that great images drive ecommerce traffic and business success. No wonder professional-looking images are so crucial for successful online apparel sales.

But taking awesome photographs of every single item on your catalog may seem intimidating. You may even be wondering, “Can I can pull off quality clothing photography on my own?”

Of course, you can.

You can get perfect clothing shots by following the 7 tips detailed here.

Tip #1: Shoot Camera RAW Files in Addition to JPG and Keep Your Master Files

A RAW file is the digital image file that’s stored on the memory card of your camera or Smartphone. This file is normally uncompressed and minimally processed.

JPG file (also known as JPEG) is short for Joint Photographic Experts Group. This standard image format contains compressed image data and requires less memory space.

Raw File
Photography For Ecommerce
JPG images maintain satisfactory image quality despite the sizeable reduction in file size. As a result, these files are used extensively on the internet, mobile devices, and computers. You can also store a large number of JPG image files in minimal storage space. And it’s easy to share them too. But when it comes to editing, a compressed image is a lot less flexible. Let’s take a quick look at the advantages of shooting camera RAW files:
  1. Capture all the data from the sensor and get the highest level of quality.
  2. Work with the most pure
  3. Create new colors of a style at a later date if needed.
  4. Create different size files for different use cases (business website, social media sites, print, product catalog, etc.)
  5. Correct over/underexposed images quickly.
  6. Retain image quality while editing.
  7. Fine gradation of tones and colors delivers better prints.
  8. Record 4,096 to 16,384 levels of brightness compared to 256 levels of brightness for JPG.
The only downside to RAW files is they are twice or thrice as large as JPG files. But with the drastic drop in the price of hard drives, this factor shouldn’t be an issue. Worried your RAW files will be unreadable in the future, and all your clothing photography efforts will be wasted? You don’t need to. I have good news on this front. Adobe has developed an open-source RAW format known as DNG (Digital Negative). With this, you can edit your RAW files 5, 10, or even 20 years in the future.
Picsera

Outsource Photo Editing Services

Picsera offers photo editing and retouching, so you can focus on your business instead. Spend a fraction of the cost, time, and effort of photography with Picsera. Click here to find out more.

Tip #2: Shoot on a Tripod to Eliminate Camera Shake

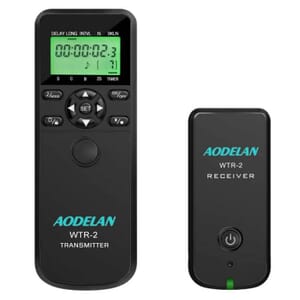
Camera shake can result in soft, blurry photos. Even experienced photographers have trouble with eliminating camera shake. While shooting on a tripod may seem like the obvious solution, you may be worried about the extra investment. The upside is a tripod will make a huge difference to product images, especially if camera shake is a persistent issue. But remember, your hand can also be a source of camera shake. So you can eliminate camera shake altogether by using a tripod with a Remote Shutter Release. The reason is a remote shutter release enables you to take photos even without touching the camera. This device isn’t expensive and is available at various price points.
Ecommerce photography equipmeny
Image credit: https://www.amazon.com/Wireless-Shutter-Release-Intervalometer-Control/dp/B07QH561BR
But don’t make the mistake of starting out with a flimsy tripod. It will only destabilize your setup, resulting in unwanted blurry images. Start with a solid tripod system instead. Before buying a tripod, evaluate whether it will remain steady, especially after mounting your heavy camera on it.
photography equipment
Image credit: https://www.amazon.com/Vanguard-Alta-Pro-263AB-100/dp/B07HKX6ZT9?ref_=ast_sto_dp&th=1
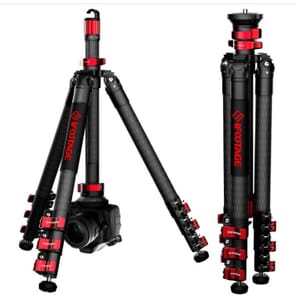
A solid carbon fiber tripod is a great investment. This lightweight tripod presents you with strong stability. The leveling feature also works well, and you can level the tripod’s head easily using the center grip.
IFootage Carbon Fiber Travel Tripod
Image credit: https://www.amazon.com/IFOOTAGE-Professional-Compatible-Camcorder-Photography/dp/B07N64B1Z3?th=1

Tip #3: Use a Fast Lens (Minimum Aperture of 1.4)

Nowadays, the latest fashion trends have become a lifestyle choice. Hence, a high-quality camera and lens are indispensable for fashion clothing photography. An important point to note is it’s better to use a prime lens than a zoom.

Capturing stunning images will help your brand stand out among competitors. You can also increase customer loyalty as shoppers on your store feel as if their shopping experience was specifically personalized for them. Let’s look at some premium lenses that promise value for money.

how to Create Clothing Photography for Ecommerce
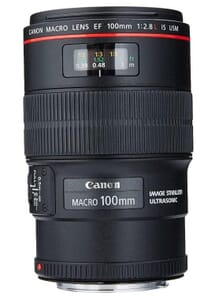
Image credit: https://www.amazon.com/Canon-100mm-Macro-Digital-Cameras/dp/B002NEGTSI
  1. The Canon EF 100mm f/2.8 is a versatile, universally compatible lens that’s perfect for ecommerce fashion photography. Equipped with an inner focusing system, this lens presents both professionals and hobbyists with a durable all-purpose lens.
Ecommerce Product Catalog Photography
Image credit: https://www.amazon.com/Sony-SEL85F18-1-8-22-Medium-Telephoto-Camera/dp/B06WLGFWGX?th=1
2. The Sony 85mm F/1.8-22 enables you to shoot product portraits minus the fear of blurry photos. This fashion portrait photography lens is ideal for studio work, where you need resolution and sharpness
Sigma 18-35mm F1.8
Image credit: https://www.amazon.com/Sigma-18-35mm-F1-8-Lens-Nikon/dp/B00DBL09FG
  1. The Sigma 18-35mm F1.8 will help you click steady vibrant photos regardless of the time of day. With this affordable and fast lens, you can capture incredible details of your products.
Ecommerce product photography
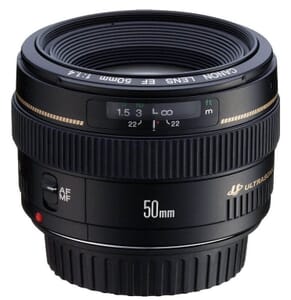
Image credit: https://www.amazon.com/Canon-Standard-Medium-Telephoto-Cameras/dp/B00009XVCZ/ref=sr_1_3?keywords=canon%2B50mm%2B1.4&qid=1644503526&sr=8-3&th=1
  1. The Canon 50mm 1.4 is an inexpensive all-round lens. The ultrasonic autofocus motor of this lens is capable of keeping up with your creativity.
Nikon
Image credit: https://www.amazon.com/Nikon-AF-S-NIKKOR-Focus-Cameras/dp/B001GCVA0U?th=1
  1. The affordable Nikon 50mm 1.4 is the perfect lens for a new photographer. This lens provides good, sharp images, and the contrast is exceptional too.

Tip #4: Shoot at the Lowest ISO Possible (ISO 100) to Eliminate Noise

Image noise (graininess) is a common problem for every photographer. It typically occurs when pictures are shot at high ISO settings. These minute dots of color or grain can ruin even perfectly composed images. Although this problem seems unavoidable, you can tackle noise in photos in many ways.

Shooting at low ISO is the most effective strategy. The lower the ISO, the lesser will be the noise and grain in your photos. But what is ISO?

ISO is a camera’s sensitivity to light. A few standard ISO values are 100, 200, 400, and 800. Camera sensors also come with intermediate ISO values, such as ISO 125, ISO 160, etc.

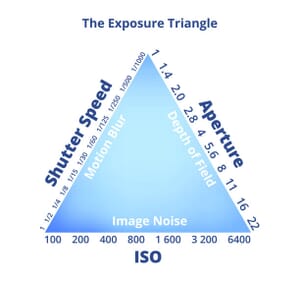
ISO determines the sensitivity of the camera sensor to light. You use ISO in conjunction with aperture and shutter speed to control the exposure of a photograph. These three factors together form the exposure triangle.

Exposure Triangle

When you reduce the ISO value, the sensitivity of the camera sensor also reduces. Each time you double the ISO, the camera will draw in twice as much light for the same exposure. Therefore, a camera will draw in two times as much light at ISO 800 as it does at ISO 400.

The base ISO is a very important setting on your camera. With this setting, you can capture the highest quality image, minimizing the visibility of noise. The base ISO in most modern digital cameras is 100. Unless you are working in low-light conditions, keep the setting at the base ISO. But take care to adjust the shutter speed to a setting that provides proper exposure. Only then you’ll get the highest image quality.

Tip #5: Shoot Against a White Backdrop to Eliminate Color Casts

On your ecommerce store, the product description copy and product reviews play an important role. But when it comes to buying decisions, a shopper relies heavily on your product images. The reason for this is because product images are the only way a shopper gets a feel of what you are selling.

Clothing photography against a white backdrop is the top choice for product-only images on your ecommerce store. For one, product-only photos are clean, as you can see below.

Clothing Photography

Evidently, the white backdrop makes your products pop. You can also maintain store consistency by choosing one background color. Since white offers the highest continuity, you can easily make products of different colors and styles look stunning.

Another advantage is product photos on a white backdrop are easier to edit. Even if you are a beginner, you can create terrific product photos on white backdrop. That’s not all. You can edit the photos yourself, as a white backdrop makes it a lot simpler.

Yet another advantage of shooting product photos against a white backdrop is you can quickly upgrade from a white backdrop to the color of your choice. You can always add a dash of your favorite color to your product photos if you think white is boring. For instance, you can make the background bright orange or light blue. But regardless of the new color you pick, white would be the best backdrop to start with as it’s easy to edit.

Tip #6: Use Continuous Lighting

Continuous lighting is best for clothing photography because the light stays on all the time. The main advantage of continuous lighting is what you see is what you get. It’s also easy to adjust light positions and output. Years ago, continuous lighting was not favored, as the lights became hot quickly during use. But with the recent technological advancements, this problem has been resolved.

LED lighting has revolutionized the industry. The latest LED lights are constant, flicker-free, and often color-adjustable. They are dimmable as well. Heat generation is minimal and LED bulbs last thousands of hours. So you can rest assured that the lighting unit will last a long time. Let’s look at the top choices in continuous lighting for clothing photography.

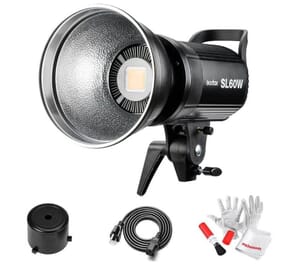
continuous lighting
Image credit: https://www.amazon.com/Godox-5600%C2%B1300K-Continuous-Wirelessly-Brightness/dp/B07PHPF41H
The quality and brightness of the Godox SL-60W light are spectacular. It’s a reliable continuous light for capturing photos and videos. Another useful feature is this small size light is portable. You can also turn the light on and off and adjust the brightness with a remote.
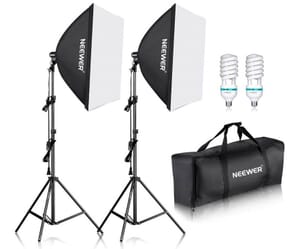
Professional Clothing Photography for Ecommerce
Image credit: https://www.amazon.com/dp/B017D7W57S?ref=vse_pfo_vdp
The Neewer 700W Professional Photography lighting kit is competitively priced but does not have battery backup. The kit includes a light stand, softbox, CFL light bulb, and carrying bag. The softbox diffuses the light and makes taking the best snaps a breeze.
Professional Ecommerce photography Equipments
Image credit: https://www.amazon.com/Photography-Lighting-2600K-10000K-Applicable-Shooting/dp/B085WKNDNQ
The RGB LED Photography Lighting kit is reasonably priced. It’s a great buy if you intend to take product photographs yourself, as you can save thousands of dollars in hiring a photography company. The full brightness is quite impressive, and you can set the lights as master and slave or operate them individually. The color modes are vibrant and very bright, as well.

Tip #7: Set Up Tethered Shooting

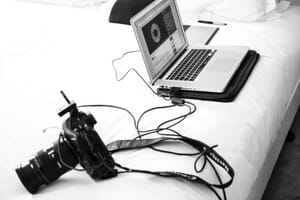
In tethered photography, you connect your camera to your computer, Smartphone, or tablet via a cable or wireless app. After the successful connection of the devices, every new image the camera captures is passed straight to the connected device and saved in a designated folder.

You can also pass the photos straight to photo management software, such as Adobe Lightroom or Capture One Pro. Adobe Lightroom and Capture One Pro support files from all the top camera brands.

Online Photography Coaching

Photography Coaching Via Zoom

Have the right tools but don’t know how to properly position your apparel? Get access to the basics, tips, and secrets to taking picture-perfect apparel shots with Picsera’s Photography Zoom Coaching. Click here to find out more.

How Does Tethered Clothing Photography Work?

As soon as the camera shutter button is released, your image is displayed (in high resolution) on the screen of the connected device. Tethering in a program like Capture One Pro lets you make quick adjustments to your file. For example, you can increase the contrast or convert the photo to black and white.
Clothing Photography for Ecommerce
Image credit: Photo by Laura Boccola on Unsplash

Most tethering programs allow you to tweak camera settings from the connected device, and you can also release the camera shutter button from your device. Also, with Capture One’s Wireless Tethering for Canon, you can take your product photoshoot to the next level without cables to obstruct your work.

In Summary

As you have seen, it’s possible to pull off the clothing photography for your ecommerce store on your own. All you need is the right photography equipment discussed in this post. But even with high-quality do-it-yourself product images, you cannot upload the RAW files due to regulations on image uploading for ecommerce platforms.

Creating realistic, picture-perfect product photos is a different ball game. But don’t worry. We have you covered in this area, and you can outsource all your product photography requirements to Picsera. We offer photo editing services, 3D rendering services, and background removal services. Our expert team specializes in delivering awesome shots with a uniform branding style.

Need help with editing photos? Let us do the work for you. Start your FREE trial today!